Showing posts with label ubuntu. Show all posts
Showing posts with label ubuntu. Show all posts
Friday, April 27, 2012
Notes on Upgrading to Ubuntu 12.04 Precise Pangolin
0. In general, the upgrading process was smooth. I have been using it for two days. Since this version is LTS, I would recommend that everyone upgrade.
1. The full-fledged Unity is so unstable that is essentially unusable. By default, the Unity Plugin is not enabled. When you log in for the first time, there is just an blank desktop, no Dash, no launcher. Some one wrote about how to fix this (http://askubuntu.com/questions/17381/unity-doesnt-load-no-launcher-no-dash-appears and http://askubuntu.com/questions/121782/blank-desktop-after-updates-today-only-unity2d-works-now), however it still does not work fine with me. In particular, if you log out and then log in again, the same blank desktop appears :-(.
2. Unity 2D works fine. The new HUD (Heads Up Display) is the killer feature.
3. Gnome Shell generally works. However the most extensions, such as User Themes, are unavailable now.
4. The default setting for dual monitors in Gnome Shell has a wired behavior. You can only switch workspaces in the primary monitor while the workspace in the secondary monitor keeps the same. To make the workspace span the two monitors, run the following command:
"gsettings set org.gnome.shell.overrides workspaces-only-on-primary false"
as pointed by http://gregcor.com/2011/05/07/fix-dual-monitors-in-gnome-3-aka-my-workspaces-are-broken/
5. In Gnome Shell, the wallpaper does not show up even I have already set it from System Settings -> Appearance. This can be fixed as following:
Open gnome-tweak-tool
click on the Desktop tab
Turn on "Have manager handle the desktop"Turn on "Computer icon visible on desktop"

Thursday, July 14, 2011
Setting Up a Hadoop Cluster
This post lists the steps to set up an Hadoop cluster in Ubuntu 11.04. Most codes can be directly copied and pasted.
* Hadoop
** Install Java
** Add Hadoop User and Group
** Configuring SSH and Password-less Login
** Install Hadoop
*** Install
*** Format HDFS
1. http://www.michael-noll.com/tutorials/running-hadoop-on-ubuntu-linux-single-node-cluster/
2. http://www.michael-noll.com/tutorials/running-hadoop-on-ubuntu-linux-multi-node-cluster/
3. http://fclose.com/b/cloud-computing/290/hadoop-tutorial/
4. Fix could only be replicated to 0 nodes instead of 1 error
* Hadoop
** Install Java
#+begin_src shell
sudo apt-get install sun-java6-jdk
sudo update-java-alternatives -s java-6-sun
#+end_src
** Add Hadoop User and Group
#+begin_src shell
sudo addgroup hadoop
sudo adduser --ingroup hadoop hadoop
#+end_src
** Configuring SSH and Password-less Login
#+begin_src sh
# In the master node
su hadoop
ssh-keygen -t rsa -P ""
for node in $(cat /conf/slaves);
do
ssh-copy-id -i $HOME/.ssh/id_rsa.pub hadoop@$node;
done
#+end_src
** Install Hadoop
*** Install
#+begin_src sh*** Update .bashrc
## download and install
cd /home/hadoop/
tar xzf hadoop-0.21.0.tar.gz
mv hadoop-0.21.0 hadoop
#+end_src
#+begin_src sh*** Update conf/hadoop-env.sh
## update .bashrc
# Set Hadoop-related environment variables
export HADOOP_HOME=/home/hadoop/hadoop
export HADOOP_COMMON_HOME="/home/hadoop/hadoop"
export PATH=$PATH:$HADOOP_HOME/bin
export PATH=$PATH:$HADOOP_COMMON_HOME/bin/
#+end_src
#+begin_src sh*** Update conf/core-site.xml
export JAVA_HOME=/usr/lib/jvm/java-6-sun
export HADOOP_OPTS=-Djava.net.preferIPv4Stack=true
#+end_src
<?xml version="1.0"?>*** Update conf/mapred-site.xml
<?xml-stylesheet type="text/xsl" href="configuration.xsl"?>
<configuration>
<!-- In: conf/core-site.xml -->
<property>
<name>hadoop.tmp.dir</name>
<value>/home/hadoop/tmp</value>
<description>A base for other temporary directories.</description>
</property>
<property>
<name>fs.default.name</name>
<value>hdfs://128.125.86.89:54310</value>
<description>The name of the default file system. A URI whose
scheme and authority determine the FileSystem implementation. The
uri's scheme determines the config property (fs.SCHEME.impl) naming
the FileSystem implementation class. The uri's authority is used to
determine the host, port, etc. for a filesystem.</description>
</property>
</configuration>
<?xml version="1.0"?>*** Update conf/hdfs-site.xml
<?xml-stylesheet type="text/xsl" href="configuration.xsl"?>
<!-- Put site-specific property overrides in this file. -->
<configuration>
<!-- In: conf/mapred-site.xml -->
<property>
<name>mapreduce.jobtracker.address</name>
<value>128.125.86.89:54311</value>
</property>
</configuration>
#+begin_src html*** Update conf/masters (master node only)
<?xml version="1.0"?>
<?xml-stylesheet type="text/xsl" href="configuration.xsl"?>
<!-- Put site-specific property overrides in this file. -->
<configuration>
<!-- In: conf/hdfs-site.xml -->
<property>
<name>dfs.replication</name>
<value>3</value>
<description>Default block replication.
The actual number of replications can be specified when the file is created.
The default is used if replication is not specified in create time.
</description>
</property>
</configuration>
#+end_src
#+begin_src sh*** Update conf/slaves (master node only)
128.125.86.89
#+end_src
#+begin_src sh*** Copy hadoop installation and configuration files to slave nodes
128.125.86.89
slave-ip1
slave-ip2
......
#+end_src
#+begin_src sh** Run Hadoop
# In the master node
su hadoop
for node in $(cat /conf/slaves);
do
scp ~/.bashrc hadoop@$node:~; scp -r ~/hadoop hadoop@#node:~;
done
#+end_src
*** Format HDFS
#+begin_src sh*** Start Hadoop
hdfs namenode -format
#+end_src
#+begin_src sh*** Run Jobs
start-dfs.sh && sleep 300 && start-mapred.sh && echo "GOOD"
#+end_src
#+begin_src sh*** Stop Hadoop
hadoop jar hadoop pipes
#+end_src
#+begin_src sh** References:
stop-mapred.sh && stop-dfs.sh
#+end_src
1. http://www.michael-noll.com/tutorials/running-hadoop-on-ubuntu-linux-single-node-cluster/
2. http://www.michael-noll.com/tutorials/running-hadoop-on-ubuntu-linux-multi-node-cluster/
3. http://fclose.com/b/cloud-computing/290/hadoop-tutorial/
4. Fix could only be replicated to 0 nodes instead of 1 error
Thursday, December 04, 2008
Installing Ubuntu on HP Pavilion dv 4 1114nr
I got a new HP Pavilion dv4 1114nr in this holiday season. It has Windows Vista Home Edition pre-installled. Here is a log on how I install ubuntu on this laptop
1. Create Windows Vista recovery disk
Boot into Window s Vista. First, since HP does not provide recovery disk with new laptops any longer, you need to create your own recovery disks in case you need Windows Vista in the future. Start -> Recovery Disk Creation and follow the instructions.
2. Re-participation the hard drive
Windows Vista comes with hand drive resizing and re-participation utilities. That's cool! It saves our trouble to search for a 3rd party software.
Follow the instructions in the following documents:
1. Screenshot Tour: Repartition your hard drive in Windows Vista
2. Can I repartition my hard disk?
3. Download
Don't bother to download ubuntu installation iso and create your own installation CD. If you have internet access (a fair weak condition, isn't it?), you can use Unetbootin (http://en.wikipedia.org/wiki/UNetbootin).
I am not exactly sure. There seems a bug with Unetbootin.
I participated my hard drive into three particitions: C: windows system partition; D: HP recovery partition; F: unformated free partition, which is intended for Linux installation.
But when I select mode as Hard Drive, only C: partition is displayed; I have to select USB Live mode and select F: partition there. I am not sure what this implies, still waiting for the result.
5. sound issues
After the installation, the speaker and the microphone does not work. Particularly, I could not use skype :-(.
Solution to "no sound problem"
Open
sudo vi /etc/modprobe.d/alsa-base
Add the following line to the end of the file
Solution to microphone problem:
It is possible due to the mic is muted.
Open Volume Control by double clicking the icon at top-right corner. Select preference and select the device for recording and playback. And cancel the mutation option.
Solution to skype "Audio playback" problem
Excute the following command in a terminal
refer to
https://bugs.launchpad.net/ubuntu/+bug/269586
https://help.ubuntu.com/community/HdaIntelSoundHowto
6. install skype
7. install songbird
8. install Java Runtime Environment
9. install Open Office 3.0
10. install Mac4lin
11. install VLC and other codecs
12 install sopcast and gsopcast (online TV channel)
13 install fcitx Chinese input
First remove default scim framework and install fcitx
Well, I come back to update this post. I just returned this hp laptop. This was the first time I bought a laptop from HP, unfortunately it was an disappointing experience. I have two issues to complain. The cpu fan is too noise. Even after I disabled the feature "Keep fan running" in BIOS, the fan still makes too much noise. The CD -ROM drive is not quiet either; it feels earthquake when the CD drive is working.
The recovery too is also annoying. I could not recovery my laptop to factory configuration, either via harddrive recovery tool or via recovery CDs. It failed with the "error 1002"; and the HP customer service can not provide any useful help (they outsource custume serive to India, as a result we have to adapt to Indian English).
Anyway, I will blacklist this model from HP: HP Pavilion dv4.
Reference:
1. Screenshot Tour: Repartition your hard drive in Windows Vista
2. Can I repartition my hard disk?
3. Unetbootin http://unetbootin.sourceforge.net/
4. Tutorial: Ubuntu Linux on HP Pavilion
http://aldeby.org/blog/index.php/howto-ubuntu-linux-on-hp-pavilion-dv2000-dv6000-dv9000-series-laptops
5. http://www.dailygyan.com/2008/11/10-things-you-should-do-immediately.html
6. Top 10 Ubuntu downloads http://lifehacker.com/5227309/top-10-ubuntu-downloads
7. http://theindexer.wordpress.com/2009/04/24/to-do-list-after-installing-ubuntu-904-aka-jaunty-jackalope/
8. Install Microsoft YaHei font http://hi.baidu.com/zzy011/blog/item/6651e3ed44a9c62f63d09f37.html
1. Create Windows Vista recovery disk
Boot into Window s Vista. First, since HP does not provide recovery disk with new laptops any longer, you need to create your own recovery disks in case you need Windows Vista in the future. Start -> Recovery Disk Creation and follow the instructions.
2. Re-participation the hard drive
Windows Vista comes with hand drive resizing and re-participation utilities. That's cool! It saves our trouble to search for a 3rd party software.
Follow the instructions in the following documents:
1. Screenshot Tour: Repartition your hard drive in Windows Vista
2. Can I repartition my hard disk?
3. Download
Don't bother to download ubuntu installation iso and create your own installation CD. If you have internet access (a fair weak condition, isn't it?), you can use Unetbootin (http://en.wikipedia.org/wiki/UNetbootin).
I am not exactly sure. There seems a bug with Unetbootin.
I participated my hard drive into three particitions: C: windows system partition; D: HP recovery partition; F: unformated free partition, which is intended for Linux installation.
But when I select mode as Hard Drive, only C: partition is displayed; I have to select USB Live mode and select F: partition there. I am not sure what this implies, still waiting for the result.
5. sound issues
After the installation, the speaker and the microphone does not work. Particularly, I could not use skype :-(.
Solution to "no sound problem"
Open
sudo vi /etc/modprobe.d/alsa-base
Add the following line to the end of the file
options options snd-hda-intel model=laptop enable_msi=1
Solution to microphone problem:
It is possible due to the mic is muted.
Open Volume Control by double clicking the icon at top-right corner. Select preference and select the device for recording and playback. And cancel the mutation option.
Solution to skype "Audio playback" problem
Excute the following command in a terminal
killall pulseaudiorefer to http://www.econowics.com/news-from-the-net/170/skype-problem-with-audio-playback-ubuntu-810-intrepid-ibex/
sudo apt-get remove pulseaudio # this seems not necessary
sudo apt-get install esound
sudo rm /etc/X11/Xsession.d/70pulseaudio
refer to
https://bugs.launchpad.net/ubuntu/+bug/269586
https://help.ubuntu.com/community/HdaIntelSoundHowto
6. install skype
7. install songbird
8. install Java Runtime Environment
9. install Open Office 3.0
10. install Mac4lin
11. install VLC and other codecs
12 install sopcast and gsopcast (online TV channel)
13 install fcitx Chinese input
First remove default scim framework and install fcitx
next modify Xsession to automatically start fictx for all users. Opensudo apt-get autoremove scim
sudo apt-get install fcitx
sudo gedit /etc/X11/Xsession.d/95xinputand chang it to
export XMODIFIERS=@im=fcitxOpen
export XIM=fcitx
export XIM_PROGRAM=fcitx
export GTK_IM_MODULE=fcitx
export QT_IM_MODULE=XIM
fcitx
Change the line about xim tosudo vim /usr/lib/gtk-2.0/2.10.0/immodule-files.d/libgtk2.0-0.immodules
"xim" "X Input Method" "gtk20" "/usr/share/locale" "en:ko:ja:th:zh"======
Well, I come back to update this post. I just returned this hp laptop. This was the first time I bought a laptop from HP, unfortunately it was an disappointing experience. I have two issues to complain. The cpu fan is too noise. Even after I disabled the feature "Keep fan running" in BIOS, the fan still makes too much noise. The CD -ROM drive is not quiet either; it feels earthquake when the CD drive is working.
The recovery too is also annoying. I could not recovery my laptop to factory configuration, either via harddrive recovery tool or via recovery CDs. It failed with the "error 1002"; and the HP customer service can not provide any useful help (they outsource custume serive to India, as a result we have to adapt to Indian English).
Anyway, I will blacklist this model from HP: HP Pavilion dv4.
Reference:
1. Screenshot Tour: Repartition your hard drive in Windows Vista
2. Can I repartition my hard disk?
3. Unetbootin http://unetbootin.sourceforge.net/
4. Tutorial: Ubuntu Linux on HP Pavilion
http://aldeby.org/blog/index.php/howto-ubuntu-linux-on-hp-pavilion-dv2000-dv6000-dv9000-series-laptops
5. http://www.dailygyan.com/2008/11/10-things-you-should-do-immediately.html
6. Top 10 Ubuntu downloads http://lifehacker.com/5227309/top-10-ubuntu-downloads
7. http://theindexer.wordpress.com/2009/04/24/to-do-list-after-installing-ubuntu-904-aka-jaunty-jackalope/
8. Install Microsoft YaHei font http://hi.baidu.com/zzy011/blog/item/6651e3ed44a9c62f63d09f37.html
Wednesday, May 07, 2008
Connecting USC VPN Network in Ubuntu
[Update 2013-02-12]
Surprisingly, this old post still receive visitors occasionally. Right now, If you just want to browse the internet and download some papers, you may try the web svn service: sslvpn1.usc.edu.
[Original Post:]
At USC, when you use computers on campus, you can use directly electronic resources, databases, electronic journals because you are in USC private network. Now suppose that you go back to your apartment off campus or you travel away from USC, how can you get access to those electronic resources that USC pays for? That's where VPN come into place. VPN, also called IP tunneling, is a secure method to access computer resources in a private network. VPN stands for "virtual private network". Generally speaking, USC runs a VPN server which listens to your call in and access request. You need to run a VPN client on your own computer, which connects to the server and offer you access to USC resources as you are in USC private network.
However, ITS only provieds official support of VPN clients for Windows (link)and Mac OS (link). Here we give a VPN solution for linux users (take Ubuntu 8.04 for example).
1. Install Network Manager Applet through the Add/Remove in the Ubuntu menu. (Most time, this applet should be installed defautly; if so, just skip to step 2);
2. Install the VPN plug-in network-manager-vpnc. Open Synaptic Package Manager, search for package network-manager-vpnc and install;
3. Left click the network manager applet (usually in the top right corner of your screen) and select VPN Connections->Configure VPN->Add. Type a name in the Connection Name box, USC VPN for example; In Gateway field, type ; In vpn3k.usc.edu; In Group Name field, type USC. Click the Optional tab, select Override user name, type in your USC account (the same as your USC email) in the textbox below. Click Apply. Close the window titled VPN Connections


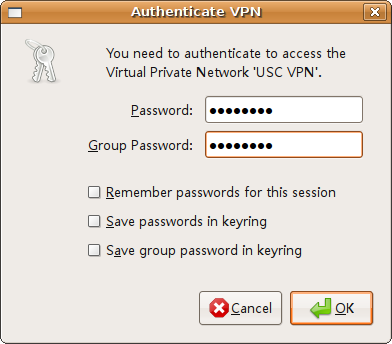
4. Left click the network manager applet and select VPN Connections then click on USC connection (USC VPN) to connect. In the above password box, type in your password associated with your USC account; in the below Group password, type GoTrojan. OK, we are done!
This tutorial is based on Ubuntu. I think you can also configure VPN client in Debian, Fedora, OpenSuse and other Linux distrobutions.
References:
1.VPN Client on Ubuntu https://help.ubuntu.com/community/VPNClient
2. Configuring the Cisco VPN 3000 Client (Windows 2000/XP/Vista) http://www.usc.edu/its/vpn/vpn3k47win.html#help
Surprisingly, this old post still receive visitors occasionally. Right now, If you just want to browse the internet and download some papers, you may try the web svn service: sslvpn1.usc.edu.
[Original Post:]
At USC, when you use computers on campus, you can use directly electronic resources, databases, electronic journals because you are in USC private network. Now suppose that you go back to your apartment off campus or you travel away from USC, how can you get access to those electronic resources that USC pays for? That's where VPN come into place. VPN, also called IP tunneling, is a secure method to access computer resources in a private network. VPN stands for "virtual private network". Generally speaking, USC runs a VPN server which listens to your call in and access request. You need to run a VPN client on your own computer, which connects to the server and offer you access to USC resources as you are in USC private network.
However, ITS only provieds official support of VPN clients for Windows (link)and Mac OS (link). Here we give a VPN solution for linux users (take Ubuntu 8.04 for example).
1. Install Network Manager Applet through the Add/Remove in the Ubuntu menu. (Most time, this applet should be installed defautly; if so, just skip to step 2);
2. Install the VPN plug-in network-manager-vpnc. Open Synaptic Package Manager, search for package network-manager-vpnc and install;
3. Left click the network manager applet (usually in the top right corner of your screen) and select VPN Connections->Configure VPN->Add. Type a name in the Connection Name box, USC VPN for example; In Gateway field, type ; In vpn3k.usc.edu; In Group Name field, type USC. Click the Optional tab, select Override user name, type in your USC account (the same as your USC email) in the textbox below. Click Apply. Close the window titled VPN Connections


4. Left click the network manager applet and select VPN Connections then click on USC connection (USC VPN) to connect. In the above password box, type in your password associated with your USC account; in the below Group password, type GoTrojan. OK, we are done!

This tutorial is based on Ubuntu. I think you can also configure VPN client in Debian, Fedora, OpenSuse and other Linux distrobutions.
References:
1.VPN Client on Ubuntu https://help.ubuntu.com/community/VPNClient
2. Configuring the Cisco VPN 3000 Client (Windows 2000/XP/Vista) http://www.usc.edu/its/vpn/vpn3k47win.html#help
Saturday, May 03, 2008
Fixing Resolution Problem of Ubuntu On Paralles Desktop
Problem
After installing Ubuntu 8.04 Hardy Heron in Parallels Desktop on my Macbook Pro, the default resolution is 1024*768. I want to use my Macbook pro's 1440*900 full resolution. I tried to use System->Preference->Screen Resolution, but there are not 1440*900 at all.
Solution
If you encounter total messy after this modificaion, don't panic because you still have the backup of the original xorg.conf!
Reference
1. http://gonz.wordpress.com/2007/09/22/fixing-screen-resolution-on-ubuntu-linux-in-parallels-desktop/
2. http://www.simplehelp.net/2007/04/30/how-to-increase-the-screen-resolutions-available-to-ubuntu-while-running-in-parallels-for-os-x/
After installing Ubuntu 8.04 Hardy Heron in Parallels Desktop on my Macbook Pro, the default resolution is 1024*768. I want to use my Macbook pro's 1440*900 full resolution. I tried to use System->Preference->Screen Resolution, but there are not 1440*900 at all.
Solution
Basic idea: The problem arises because Ubuntu fails to detect the settings of my monitor automatically. Then can I mannually modify xorg.conf to set the right resolution? Let's go!
Open up a terminal. First Backup the original xorg.conf
Next open, open xorg.conf with your favorite editor
sudo vi /etc/X11/xorg.conf
Search the section "Screen" like below.
Probabably your file contains more lines similar to the following
Section "Screen"
   Identifier "Default Screen"
   Device  "Generic Video Card"
   Monitor  "Generic Monitor"
EndSection
Note the line "Modes "1024x768" "800x600" "640x480"". It says that there are three different kinds resolutions, but our desired resolution 1440x900 is omitted. So we can simply add this resolution option. It is like the following after modification
SubSection "Display"
   Depth  24
   Modes  "1024x768" "800x600" "640x480"
EndSubSection
It’ll appear several times throughout the file. Each time you see it, just add your desired resolution (in your case, 1440×900).
SubSection "Display"
   Depth  24
   Modes  "1440x900" "1024x768" "800x600" "640x480"
EndSubSection
If your file doesn't contain a similar Subsection "Display" inside the Section "Screen" (as shown above), you just add the Subsection "Display" yourself. And th final result looks like
Finally save the above modifications. Restart your X session by pressing Ctrl-Atl-Breakspace (or reboot your ubuntu), it just works!
Section "Screen"
   Identifier "Default Screen"
   Device  "Generic Video Card"
   Monitor  "Generic Monitor"
   DefaultDepth 24
   SubSection "Display"
       Depth  1
       Modes  "1440x900" "1024x768" "800x600" "640x480"
   EndSubSection
   SubSection "Display"
       Depth  4
       Modes  "1440x900" "1024x768" "800x600" "640x480"
   EndSubSection
   SubSection "Display"
       Depth  8
       Modes  "1440x900" "1024x768" "800x600" "640x480"
   EndSubSection
   SubSection "Display"
       Depth  15
       Modes  "1440x900" "1024x768" "800x600" "640x480"
   EndSubSection
   SubSection "Display"
       Depth  16
       Modes  "1440x900" "1024x768" "800x600" "640x480"
   EndSubSection
   SubSection "Display"
       Depth  24
       Modes  "1440x900" "1024x768" "800x600" "640x480"
   EndSubSection
EndSection
If you encounter total messy after this modificaion, don't panic because you still have the backup of the original xorg.conf!
Reference
1. http://gonz.wordpress.com/2007/09/22/fixing-screen-resolution-on-ubuntu-linux-in-parallels-desktop/
2. http://www.simplehelp.net/2007/04/30/how-to-increase-the-screen-resolutions-available-to-ubuntu-while-running-in-parallels-for-os-x/
Subscribe to:
Posts (Atom)