Wednesday, May 07, 2008

Connecting USC VPN Network in Ubuntu

[Update 2013-02-12]
Surprisingly, this old post still receive visitors occasionally. Right now, If you just want to browse the internet and download some papers, you may try the web svn service: sslvpn1.usc.edu.

[Original Post:]
At USC, when you use computers on campus, you can use directly electronic resources, databases, electronic journals because you are in USC private network. Now suppose that you go back to your apartment off campus or you travel away from USC, how can you get access to those electronic resources that USC pays for? That's where VPN come into place. VPN, also called IP tunneling, is a secure method to access computer resources in a private network. VPN stands for "virtual private network". Generally speaking, USC runs a VPN server which listens to your call in and access request. You need to run a VPN client on your own computer, which connects to the server and offer you access to USC resources as you are in USC private network.

However, ITS only provieds official support of VPN clients for Windows (link)and Mac OS (link). Here we give a VPN solution for linux users (take Ubuntu 8.04 for example).

1. Install Network Manager Applet through the Add/Remove in the Ubuntu menu. (Most time, this applet should be installed defautly; if so, just skip to step 2);

2. Install the VPN plug-in network-manager-vpnc. Open Synaptic Package Manager, search for package network-manager-vpnc and install;

3. Left click the network manager applet (usually in the top right corner of your screen) and select VPN Connections->Configure VPN->Add. Type a name in the Connection Name box, USC VPN for example; In Gateway field, type ; In vpn3k.usc.edu; In Group Name field, type USC. Click the Optional tab, select Override user name, type in your USC account (the same as your USC email) in the textbox below. Click Apply. Close the window titled VPN Connections


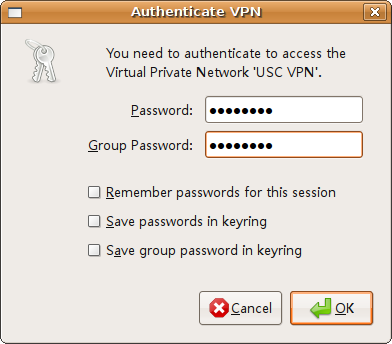
4. Left click the network manager applet and select VPN Connections then click on USC connection (USC VPN) to connect. In the above password box, type in your password associated with your USC account; in the below Group password, type GoTrojan. OK, we are done!

This tutorial is based on Ubuntu. I think you can also configure VPN client in Debian, Fedora, OpenSuse and other Linux distrobutions.

References:
1.VPN Client on Ubuntu https://help.ubuntu.com/community/VPNClient
2. Configuring the Cisco VPN 3000 Client (Windows 2000/XP/Vista) http://www.usc.edu/its/vpn/vpn3k47win.html#help

Saturday, May 03, 2008

Fixing Resolution Problem of Ubuntu On Paralles Desktop

Problem

After installing Ubuntu 8.04 Hardy Heron in Parallels Desktop on my Macbook Pro, the default resolution is 1024*768. I want to use my Macbook pro's 1440*900 full resolution. I tried to use System->Preference->Screen Resolution, but there are not 1440*900 at all.

Solution

Basic idea: The problem arises because Ubuntu fails to detect the settings of my monitor automatically. Then can I mannually modify xorg.conf to set the right resolution? Let's go!

Open up a terminal. First Backup the original xorg.conf

sudo cp /etc/X11/xorg.conf  /etc/X11/xorg.conf.backup

Next open, open xorg.conf with your favorite editor

sudo vi /etc/X11/xorg.conf

Search the section "Screen" like below.

Section "Screen"
Identifier "Default Screen"
Device "Generic Video Card"
Monitor "Generic Monitor"
EndSection

Probabably your file contains more lines similar to the following

SubSection "Display"
Depth 24
Modes "1024x768" "800x600" "640x480"
EndSubSection

Note the line "Modes "1024x768" "800x600" "640x480"". It says that there are three different kinds resolutions, but our desired resolution 1440x900 is omitted. So we can simply add this resolution option. It is like the following after modification

SubSection "Display"
Depth 24
Modes "1440x900" "1024x768" "800x600" "640x480"
EndSubSection

It’ll appear several times throughout the file. Each time you see it, just add your desired resolution (in your case, 1440×900).

If your file doesn't contain a similar Subsection "Display" inside the Section "Screen" (as shown above), you just add the Subsection "Display" yourself. And th final result looks like

Section "Screen"
Identifier "Default Screen"
Device "Generic Video Card"
Monitor "Generic Monitor"
DefaultDepth 24
SubSection "Display"
Depth 1
Modes "1440x900" "1024x768" "800x600" "640x480"
EndSubSection
SubSection "Display"
Depth 4
Modes "1440x900" "1024x768" "800x600" "640x480"
EndSubSection
SubSection "Display"
Depth 8
Modes "1440x900" "1024x768" "800x600" "640x480"
EndSubSection
SubSection "Display"
Depth 15
Modes "1440x900" "1024x768" "800x600" "640x480"
EndSubSection
SubSection "Display"
Depth 16
Modes "1440x900" "1024x768" "800x600" "640x480"
EndSubSection
SubSection "Display"
Depth 24
Modes "1440x900" "1024x768" "800x600" "640x480"
EndSubSection
EndSection

Finally save the above modifications. Restart your X session by pressing Ctrl-Atl-Breakspace (or reboot your ubuntu), it just works!

If you encounter total messy after this modificaion, don't panic because you still have the backup of the original xorg.conf!

Reference
1. http://gonz.wordpress.com/2007/09/22/fixing-screen-resolution-on-ubuntu-linux-in-parallels-desktop/
2. http://www.simplehelp.net/2007/04/30/how-to-increase-the-screen-resolutions-available-to-ubuntu-while-running-in-parallels-for-os-x/